
- piholeonblack
- Jonathan Haack
- Haack's Networking
- netcmnd@jonathanhaack.com
piholeonblack
This tutorial is for setting up a vanilla pihole instance on the Beagle Bone Black using a stripped down/clean Debian OS. The first step is to update/upgrade, then remove the files in /opt/ which are not required, and lastly to remove the software that will conflict with the pihole software and that is installed by default by BBB. (Do not remove anything starting with bb- as that is firmware needed for the device to work properly - believe me, I have tried.) Save removal of connman for after pihole installation takes over DNS. Here is what I do in order:
sudo apt update
sudo apt dist-upgrade
sudo reboot
sudo rm -rf /opt/*
sudo apt remove --purge nginx* nodejs* apache2*
sudo apt autoremove
sudo apt autoclean
sudo reboot
Shell back in to the fresh system without clutter, and now run the installation script provided by pihole. Certainly look over the code first and/or visit their website for the latest script.
sudo -i
curl -sSL https://install.pi-hole.net | bash
Once it completes, it will fail to start pihole-FTL.service. The first reason is because the native dnsmasq configuration is conflicting with the re-write of dnsmasq that is provided by the pihole package. To get rid of this error, instruct the device to not use the default generated dnsmasq, create a leasefile for pihole to use with proper permissions, and remove two conflicting lines from the stock dnsmasq configuration (cache/leasefile) that the pihole software will conflict with (these conflicts can be verified in logs on pihole GUI). I typically reboot once more after these changes, just to make sure it comes back online, etc., but you will still not be in the clear.
sudo nano /etc/default/bb-wl18xx
USE_GENERATED_DNSMASQ=no
rm /var/lib/misc/dnsmasq.leases
touch /var/lib/misc/dnsmasq.leases
chown pihole:pihole /var/lib/misc/dnsmasq.leases
sudo nano /etc/dnsmasq.d/SoftAp0
#interface=usb0
#interface=usb1
#cache-size=2048
#dhcp-leasefile=/var/run/dnsmasq.leases
sudo reboot
The next problem is that the Beagle Bone Black's network manager, connman, which is controlling both DNS/DHCP, is still installed and is starting on port 53 prior to the pihole-FTL.service, thus the pihole cannot start managing DNS since the port is already in use. However, the pihole is now ready to take over DNS and the DHCP client settings for the device itself (not to be confused with using the pihole as a DHCP server). Thus, it is now safe to remove connman without having to configure /etc/interfaces or do anything else to dnsmasq since pihole will take care of both henceforward.
sudo apt remove --purge connman
sudo reboot [OR, if you don't have serial and/or lose connection, unplug and plug back in after 5-10]
More than likely, the Beagle Bone Black will hang at around 20/30% of the removal, since it will have lost its dhcp client reservation. Personally, I always have serial connected just in case, but if not, wait 5-10 minutes and then unplug and plug the device back in, and connman will be removed, and pihole-FTL.service will now be able to start and listen on port 53 and manage DNS requests, and the pihole will configure the device properly as a dhcp client underneath your router. The next step is to configure your router DHCP server to utilize the pihole DNS for its clients. In my case, I use openWRT so I go to Interfaces / LAN / DHCP Server / Advanced Settings. In that area, you can specify what DNS the router should use:
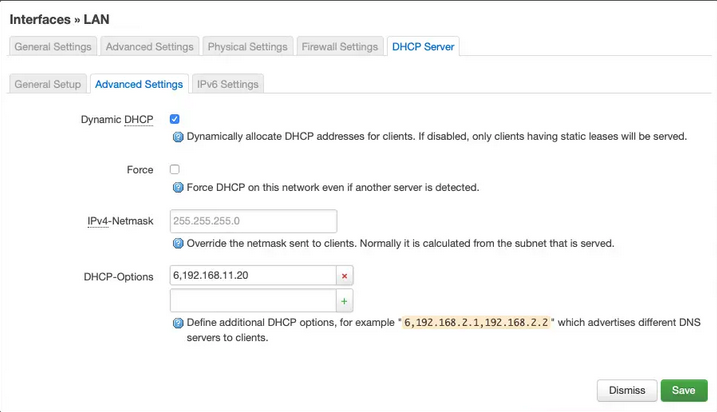
Replace 6, 192.168.11.20 with your pihole's LAN address. In my case, I instruct my router to issue a static local ip to the device (which pihole also recommends). Once you complete this last step, restart the router. Then, restart all of the clients on the LAN. Lastly, to verify that the pihole DNS is in fact being used, use the admin GUI in your browser and navigate to Tools / Network, and ensure each device came back online using the pihole DNS. Please note: Beagle Bone users specifically, will see an entry pihole device itself listed as not using the pihole's own DNS in red - this is because connman was not using the pihole DNS for one of the stages above. You will see another more current entry for the pihole device itself indicating that it is now utilizing its own DNS.
Thanks to Freedom to Play, Embedded Knowledge, and Jared from ABQ GLUG for the idea to tinker with this.
— oemb1905 2021/10/27 11:17
