- spfdkim
- Jonathan Haack
- Haack's Networking
- netcmnd@jonathanhaack.com
#hacking #freesoftware #gnulinux
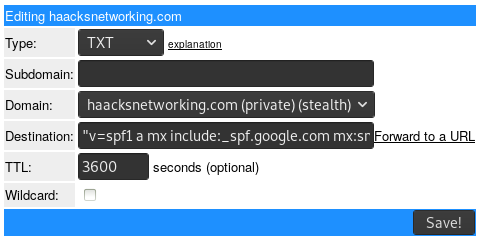
I finally got tired of my email triggering recipients SPAM filters, and worse, I was sometimes flagged by other tech colleagues' services because of my domains lacking these records. After a bit of searching online, I found that for spf records, you need to specify your MX handler and any servers you use to send from on behalf of that domain. In my case, I use a GSuite for my email and a Digital Ocean VPS for one of my external servers. I went to my DNS host at afraid.org and entered a TXT record parsed as follows:
v=spf1 a mx include:_spf.google.com mx:smtp.haacksnetworking.com ~all
The ~all flag informs recipients that they should reject emails from any sender besides those whose TXT record this was entered on behalf of, specifically, haacksnetworking.com. As for DKIM, since I use Google, I had to first generate an DKIM key on the GSuite side of things. To get there, navigate to:
Apps > GSuite > Settings for Gmail > Authenticate email
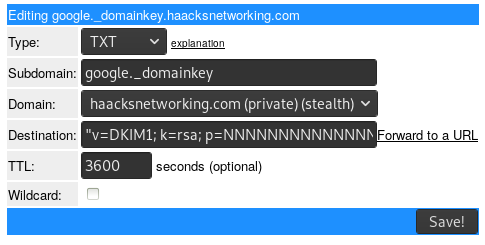
Once you found it, simply generate a record. After that, return to your DNS host and enter the TXT record. I use afraid.org so it looks something like the image below. Afraid.org barfed at the string length, but was nice enough to parse the string length to a size that Josh finds preferable (despite the spec permitting the length Google uses):
Of course, all of this is simply an exercise at shooting at the dark unless you validate it all. Of course, sending emails to your friends and asking them if it got tagged as SPAM is pretty ineffective, so I hunted online and found the DKIM Validator which validates both exchanges.
[Update: Added DMARC]
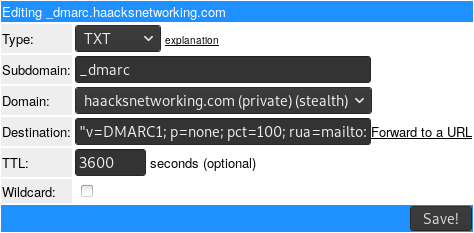
Okay, now that you have both an SPF record and DKIM record you can optionally set up another TXT record for DMARC. This will tell the recipient that there is an SPF/DKIM record in place and who to contact in cases of violation. The destination was parsed as follows:
v=DMARC1; p=none; pct=100; rua=mailto:user@domain.com
On afraid .org, this looks like:
Some folks want to set up DKIM on their own email server instead of just with Google Workspace. If that's so, here's what you need to do:
sudo apt install opendkim opendkim-tools
sudo adduser postfix opendkim
sudo nano /etc/opendkim.conf
<Canonicalization   relaxed/simple>
<Mode               sv>
<SubDomains         no>
<Nameservers     8.8.8.8,1.1.1.1>
<KeyTable           refile:/etc/opendkim/key.table>
<SigningTable       refile:/etc/opendkim/signing.table>
<ExternalIgnoreList  /etc/opendkim/trusted.hosts>
<InternalHosts       /etc/opendkim/trusted.hosts>
Now that the configuration for DKIM is ready, let's create the keys and content for the locations specified above:
sudo mkdir -p /etc/opendkim/keys
sudo chown -R opendkim:opendkim /etc/opendkim
sudo chmod 711 /etc/opendkim/keys
sudo nano /etc/opendkim/signing.table
<*@example.com      default._domainkey.example.com>
<*@*.example.com    default._domainkey.example.com>
sudo nano /etc/opendkim/key.table
<default._domainkey.example.com     example.com:default:/etc/opendkim/keys/example.com/default.private>
sudo nano /etc/opendkim/trusted.hosts
<.domain.com>
sudo mkdir /etc/opendkim/keys/example.com
sudo opendkim-genkey -b 2048 -d example.com -D /etc/opendkim/keys/example.com -s default -v
sudo chown opendkim:opendkim /etc/opendkim/keys/example.com/default.private
sudo chmod 600 /etc/opendkim/keys/example.com/default.private
It's now time to create the corresponding TXT record for this DKIM key. To do that, display the key with sudo cat /etc/opendkim/keys/example.com/default.txt and then copy everything between the parentheses into your TXT record with default._domainkey as the host instead of google._domainkey like the first picture. After the DKIM TXT record caches, test your server's dkim as follows:
sudo opendkim-testkey -d example.com -s default -vvv
Note that that output will display “key not secure” unless you configure DNSSEC, which this tutorial has not done. If your server is using postfix smtp, then leverage this DKIM key as follows:
sudo mkdir /var/spool/postfix/opendkim
sudo chown opendkim:postfix /var/spool/postfix/opendkim
sudo nano /etc/opendkim.conf
<Socket    local:/var/spool/postfix/opendkim/opendkim.sock>
sudo nano /etc/default/opendkim
<SOCKET="local:/var/spool/postfix/opendkim/opendkim.sock">
sudo nano /etc/postfix/main.cf
<milter_default_action = accept>
<milter_protocol = 6>
<smtpd_milters = local:opendkim/opendkim.sock>
<non_smtpd_milters = $smtpd_milters>
It's now a good time to test your email quality with Mail Tester to see if you got a 10/10 score. You can do this through postfix and an email client or directly from the server as follows:
echo "Hi Relay Server, I am testing you" | mail -s "Subject - DKIM Test" oemb1905@jonathanhaack.com
Just check the headers and see if DKIM: passed is present.
— oemb1905 2022/12/10 22:45


